
As a landscape designer with eight years of experience building xeriscape and dry landscapes, I’ve learned exactly what makes a Zen garden survive the elements versus turn into a weedy mess. A Zen garden (or Karesansui) is a Japanese dry landscape that uses rocks and raked gravel to represent nature in its most abstract, peaceful form. Here is exactly how to build one that actually lasts.
Quick Answer: Choose a quiet location, remove weeds, install commercial-grade woven weed fabric, place your anchor rocks before adding gravel, spread 2–4 inches of crushed granite, and finish with carefully raked patterns. Leave about 70% of the space completely empty to create the minimalist calm that defines this style.
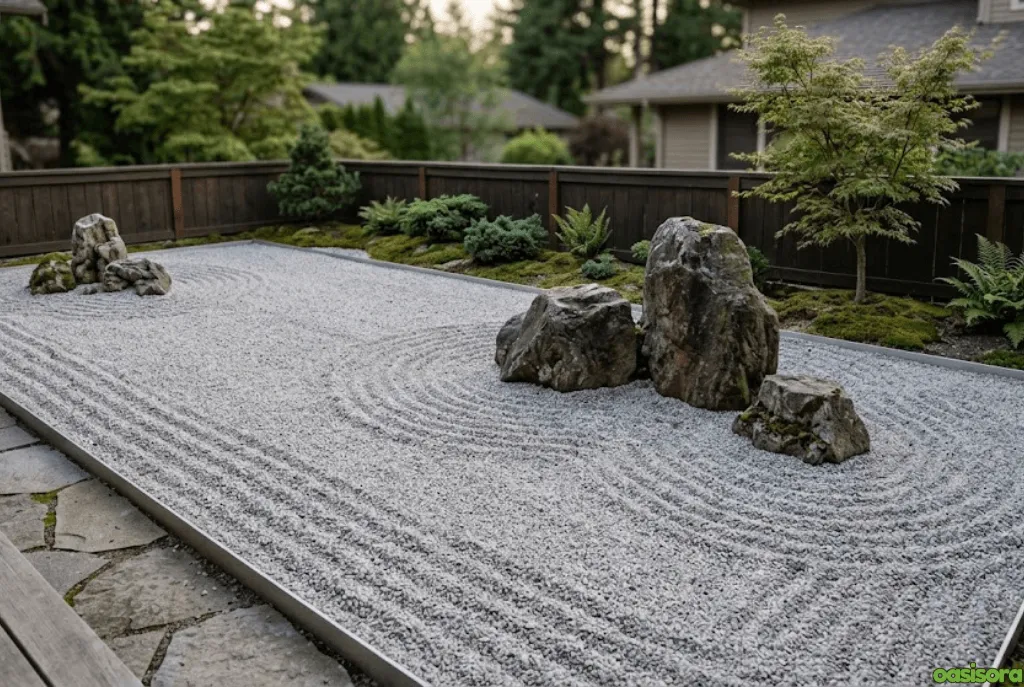
Subject: Finished minimalist backyard Zen garden with raked crushed granite, weathered anchor stones, and restrained planting.
Purpose: Show the finished result readers are trying to create.
Composition: Wide landscape view from the garden’s primary viewing position; strong negative space; no people; uncluttered composition.
Suggested filename: minimalist-backyard-zen-garden-raked-gravel.jpg
Suggested alt text: Minimalist backyard Zen garden with raked gravel and weathered stones
Quick Match: Which Zen Garden Should You Build?
If you want to skip the reading and jump straight to your specific situation, use this decision matrix:
| Your Situation | Best Type to Build | Relevant Section |
| If you live in an apartment | A tabletop or tray-based dry garden | Planning Your Layout |
| If you have a small patio | A courtyard-style bordered gravel garden | Essential Materials |
| If you have a bare backyard lawn | A full-scale traditional Karesansui | Step-by-Step: How to Build |
| If you want a social-media-friendly raking aesthetic | A garden focused on ASMR raking and minimalist shapes | Rake Traditional Patterns |
What Is the Concept of a Zen Garden?
The Philosophy Behind Karesansui
Karesansui translates to “dry landscape.” Carefully raked gravel symbolizes flowing water, while large rocks represent islands or mountains. However, the most crucial element is the open gravel, which creates negative space that allows the mind to rest. Whenever I design these gardens, I remind clients that the empty space isn’t wasted space—it is the feature that creates the strongest feeling of calm.
💡 EXPERT INSIGHT: If you’re unsure whether you’ve added enough decorative elements, stop and step back. I once removed a 40-pound boulder from a client’s garden, and the entire space instantly felt twice as expansive and calm.
Why Traditional Gardens Are Meant to Be Viewed, Not Walked Through
While decorative rock gardens originated in China, Japanese Zen Buddhist monks refined the concept between the 14th and 16th centuries. Unlike Western gardens, traditional Zen gardens were designed to be viewed from a single fixed location on a veranda for quiet contemplation.
If you want to explore the broader history and variations of this style, you can dive deeper into traditional Japanese garden design principles.
The Core Principles of Zen Garden Design
Before purchasing materials, you must understand the design principles that separate a true Zen garden from an ordinary rock garden.
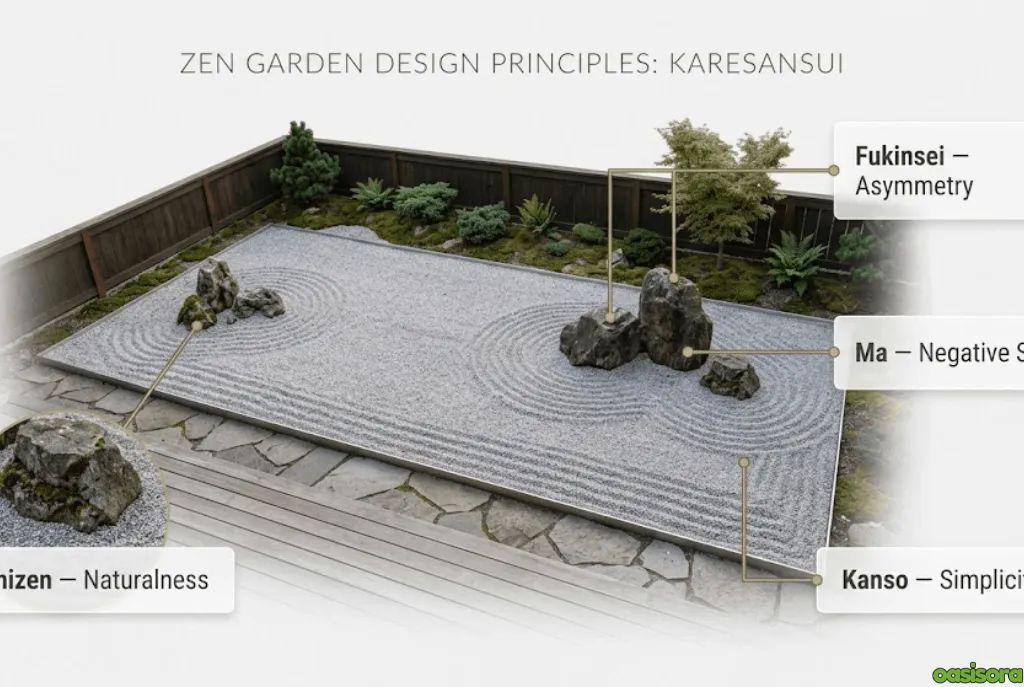
Subject: Zen garden design principles showing asymmetry (Fukinsei), negative space (Ma), naturalness (Shizen), and simplicity (Kanso).
Purpose: Explain four abstract design principles visually instead of relying entirely on prose.
Composition: Simple labeled garden diagram with rocks, open gravel, restrained planting, and asymmetrical grouping.
Suggested filename: zen-garden-design-principles-asymmetry-negative-space.jpg
Suggested alt text: Diagram showing asymmetry and negative space in Zen garden design
| Principle | Purpose | Common Beginner Mistake |
| Asymmetry (Fukinsei) | Creates natural balance | Arranging rocks in straight lines or even numbers |
| Empty Space (Ma) | Creates calm and focus | Filling every empty area with ornaments or plants |
| Naturalness (Shizen) | Mimics nature | Using perfectly identical, polished rocks from a big-box store |
| Simplicity (Kanso) | Eliminates visual clutter | Adding too many types of plants or water features |
Planning Your Zen Garden Layout
Every successful Zen garden begins with careful planning. Decide how the garden will actually be experienced before buying a single bag of gravel. Traditional gardens are designed around one primary viewing position—everything should draw attention toward that focal point.
Measure Before You Build
I always recommend measuring the area before buying gravel to avoid purchasing far more stone than you need. Record the total length, width, desired gravel depth (2–4 inches), and the number of major rocks. Having these measurements allows you to calculate gravel quantities accurately using a simple cubic feet formula.
Create a Simple Layout Sketch
Even a rough sketch prevents expensive mistakes. Mark the location of anchor stones, gravel areas, trees, and your viewing position.
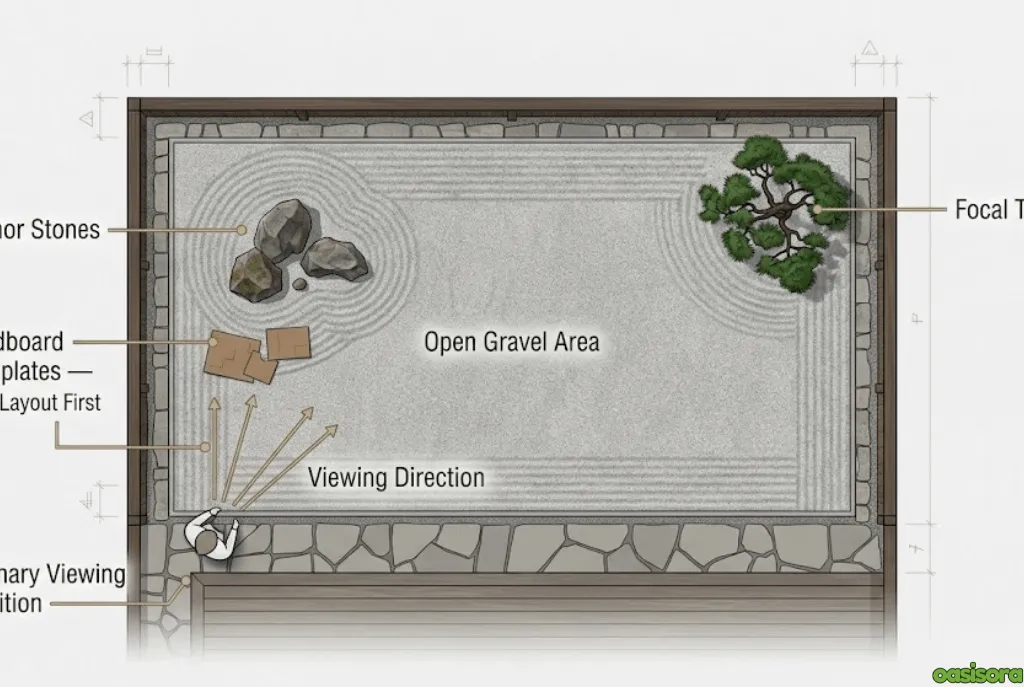
Subject: Top-view blueprint of a Zen garden showing anchor rocks, open gravel areas, a focal tree, and the primary viewing position.
Purpose: Help readers understand spatial relationships before construction begins.
Composition: Clean top-down plan with simple labels and arrows indicating viewing direction.
Suggested filename: zen-garden-layout-blueprint-viewing-position.jpg
Suggested alt text: Top-view Zen garden layout showing rocks, gravel, tree, and viewing position
💡 PRO TIP: Before moving heavy rocks, I cut cardboard templates the same size as each stone and place them around the garden first. It’s much easier to move cardboard than 150-pound boulders to test a layout.
Essential Materials and Tools You Need
The difference between a Zen garden that lasts one season and one that lasts twenty years is the quality of the foundation. I learned this the hard way after using lightweight landscape fabric that tore within two years. Since then, I strictly follow commercial-grade weed barrier recommendations from university agricultural extensions to ensure the fabric actually blocks rhizomes.
| Material | Average Cost | Lifespan | Recommendation |
| Crushed Granite | $$ | 20+ Years | ✅ Best Choice (Locks together) |
| Decomposed Granite | $$ | 15–20 Years | ✅ Excellent |
| Pea Gravel | $$ | 20 Years | ❌ Not Recommended (Scatters easily) |
| Play Sand | $ | 1–2 Years | ❌ Avoid (Washes away in rain) |
| Commercial Weed Fabric | $$ | 10+ Years | ✅ Essential |
Shopping Checklist
□ Commercial woven weed fabric (not plastic)
□ Landscape staples
□ Crushed or decomposed granite
□ Steel landscape edging
□ Large feature rocks (odd numbers)
□ Wooden Zen rake
□ Wheelbarrow, shovel, hand tamper, level
Choosing the Right Elements for Your Zen Garden
Every element must have a purpose. I start with the rocks first—not the plants—because they become the permanent framework of the garden.
How Do I Choose Rocks for a Zen Garden?
Choose weathered stones with irregular shapes, natural textures, and subtle color variations. Avoid polished or perfectly symmetrical rocks. Group stones in odd numbers (3, 5, or 7) to maintain asymmetry.
💡 EXPERT INSIGHT: Before permanently setting any stone, stand exactly where you’ll actually view the garden. A composition that looks balanced from one angle can appear completely flat and awkward from another.
What Is the Best Gravel for a Zen Garden?
I almost always recommend crushed granite. Its angular particles interlock more readily than rounded pea gravel, helping rake lines remain defined instead of collapsing as the stones roll. Many beginners choose pea gravel because it looks attractive in bags at the garden center, but maintaining clean ripple patterns in it is nearly impossible.
What Plants Work Best in a Zen Garden?
Plants should support the landscape, not dominate it. Instead of a random list, choose plants based on the specific problem they solve for your space:
Best for Deep Shade & Texture
- Moss: Requires high water but offers unmatched traditional texture.
- Black Mondo Grass: Low maintenance, creates a striking dark contrast against light gravel.
Best for Structural Form (Focal Points)
- Dwarf Japanese Maple: Needs part-shade and medium water; chosen strictly for its branching silhouette, not its flowers.
- Mugo Pine: Full sun, low water, requires almost zero pruning.
How to Build Your Zen Garden
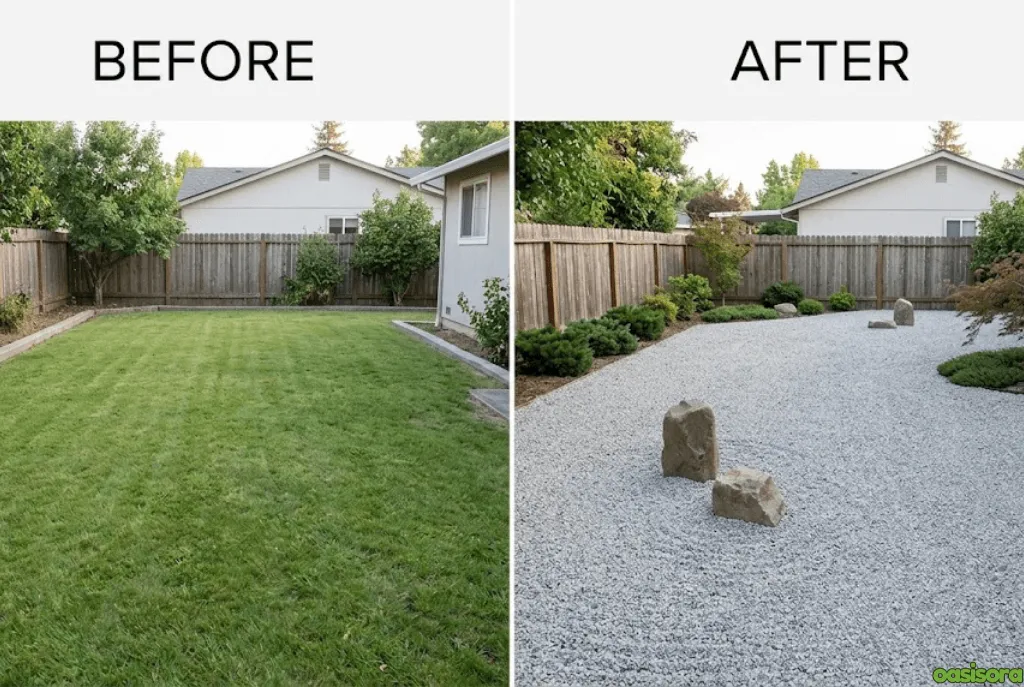
Subject: Backyard lawn transformed into a minimalist Zen garden.
Purpose: Give readers a visual overview of the transformation before the detailed construction steps.
Composition: Side-by-side before-and-after images from approximately the same camera position.
Suggested filename: before-after-backyard-zen-garden-build.jpg
Suggested alt text: Before and after backyard transformation into a minimalist Zen garden
Step 1: Prepare the Site
Remove Existing Grass and Weeds
Clear all vegetation until only bare soil remains. If perennial weeds like Bermuda grass are present, remove as much of the root system as possible. I usually wait a week after clearing aggressive weeds before laying fabric—if new shoots appear, it’s easier to kill them before the gravel goes down.
Level and Compact the Soil
Rake the soil smooth and compact it with a hand tamper. Skipping compaction is a common DIY mistake; loose soil settles beneath heavy stones, creating uneven depressions.
Install Commercial Weed Fabric
Roll the fabric across the entire area. Overlap seams by at least six inches and secure them with landscape staples every few feet. This layer is your garden’s long-term defense system.
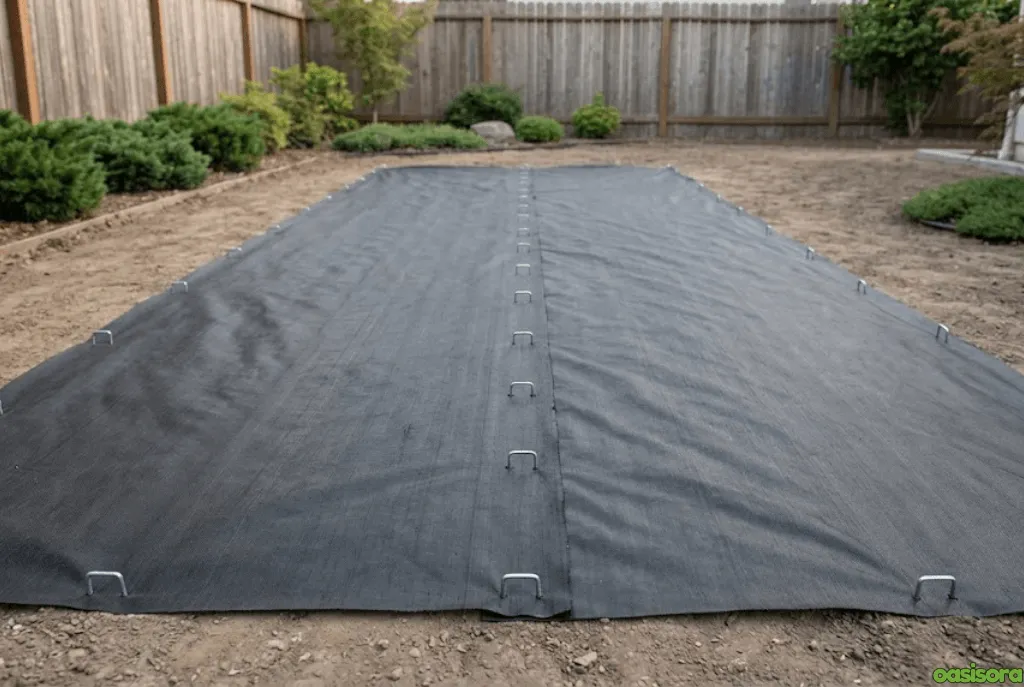
Subject: Installing and securing woven weed fabric over a prepared and compacted Zen garden base.
Purpose: Show the correct installation technique for a step that is difficult to visualize from text alone.
Composition: Close or medium-wide construction shot showing fabric overlap, landscape staples, and prepared soil.
Suggested filename: install-zen-garden-weed-fabric.jpg
Suggested alt text: Installing woven weed fabric over a prepared Zen garden base
Step 2: Place the Anchor Rocks First
Never spread gravel before positioning your largest stones. Heavy rocks are much easier to move across compacted soil than across finished gravel.
Test Different Arrangements
Experiment with layouts before digging. Walk back to your primary viewing position after every adjustment.
Set Each Rock One-Third Below Ground
Dig shallow holes so every stone appears naturally rooted. Rotate every stone several times before final placement—many rocks have one side that naturally looks stronger or more balanced.
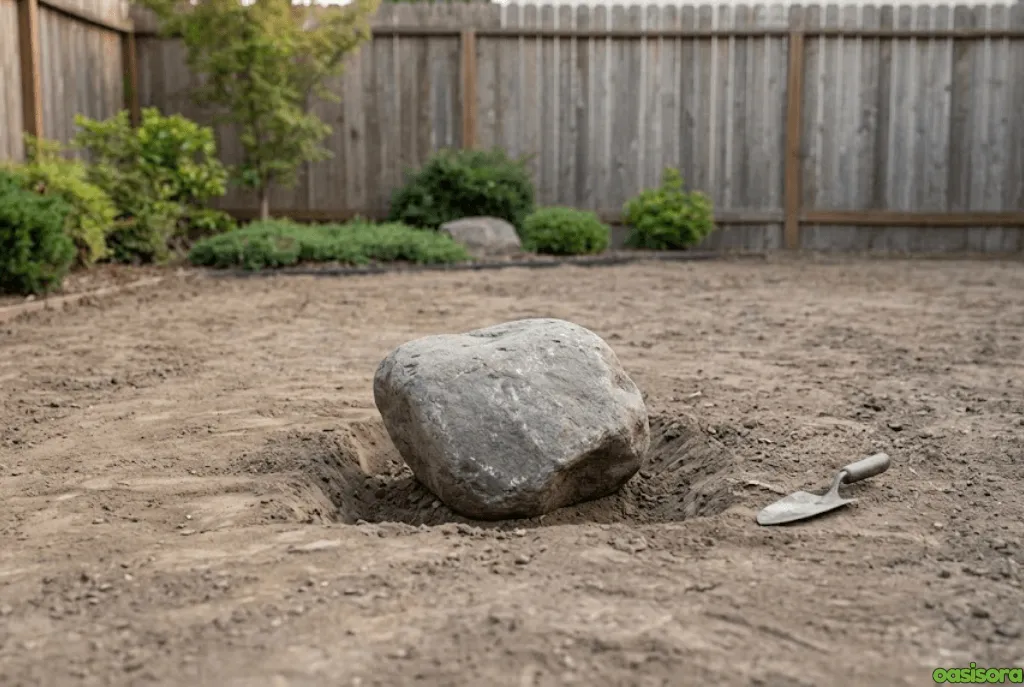
Subject: Anchor stone being partially buried and positioned in compacted ground before gravel installation.
Purpose: Show what “one-third below ground” should look like and demonstrate natural stone placement.
Composition: Side-view or three-quarter construction shot with the stone, shallow hole, and surrounding soil clearly visible.
Suggested filename: zen-garden-anchor-rock-placement.jpg
Suggested alt text: Anchor rock partially buried in a Zen garden before gravel installation
Install the Gravel
Spread 2–4 Inches of Crushed Granite
Distribute the gravel evenly across the weed barrier using a landscape rake.
Install Steel Landscape Edging
Secure steel edging around the perimeter to keep gravel contained. Although plastic edging is cheaper, it becomes brittle and shifts with temperature changes. Install the edging about ¼ inch below the finished gravel surface so it remains invisible.
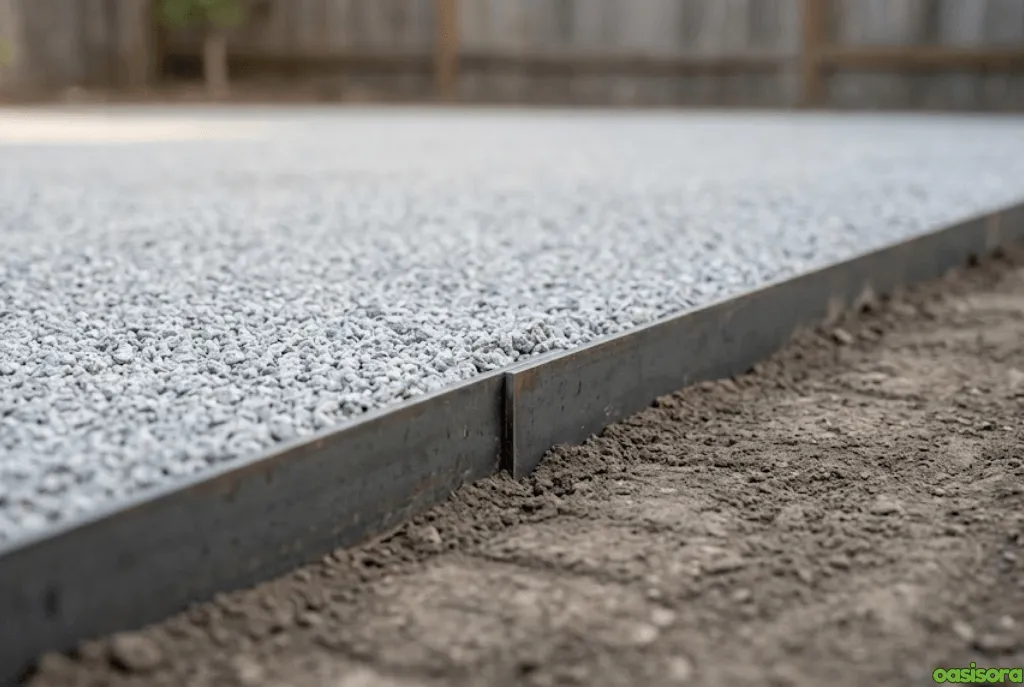
Subject: Finished crushed granite being leveled against concealed steel landscape edging.
Purpose: Demonstrate the correct relationship between gravel depth and edging height.
Composition: Close-up showing the gravel surface, edge restraint, and finished surface level.
Suggested filename: zen-garden-gravel-steel-edging-installation.jpg
Suggested alt text: Crushed granite installed against concealed steel landscape edging
Add Plants Carefully
Cut an “X” in the Weed Fabric
For every tree or shrub, cut a small X where the plant will be installed and fold the fabric back. This preserves the weed barrier while allowing the plant to establish.
Plant and Hide the Fabric
Dig the hole, place the plant, backfill with soil, then fold the fabric tightly around the base. Cover any exposed fabric with gravel or moss. Leave a small gap around tree trunks instead of piling gravel against the bark—this improves airflow and reduces trunk rot.
If you are working with a smaller space, you can easily adapt these steps to create a DIY tabletop version for your apartment.
Step 5: Rake Traditional Patterns
Raking is one of the defining features of a Zen garden. The patterns symbolize flowing water while encouraging mindfulness. ASMR videos of Zen garden raking have also gained attention on social media, reflecting the meditative appeal of this process.
Create Circular Ripples Around Stones
Use a wooden Zen rake to form concentric circles around each major rock, representing water flowing around islands.
Create Straight Waves Across Open Areas
In larger gravel spaces, rake long parallel lines to represent calm water. Blend the straight lines gently into the circular ripples for a natural transition.
💡 PRO TIP: Always rake after the gravel has settled for a day or two. Freshly spread gravel shifts easily, making crisp patterns harder to maintain.

Subject: Close-up of traditional Zen garden rake patterns showing circular ripples around a natural stone transitioning into straight lines.
Purpose: Show readers exactly what the finished raking patterns should look like.
Composition: Detailed overhead or low-angle close-up with both circular and straight patterns clearly visible.
Suggested filename: traditional-zen-garden-rake-patterns.jpg
Suggested alt text: Traditional Zen garden rake patterns around a natural stone
Does Your Zen Garden Look Right? Quality Check
Before considering the project finished, walk to your primary viewing position and evaluate these four points:
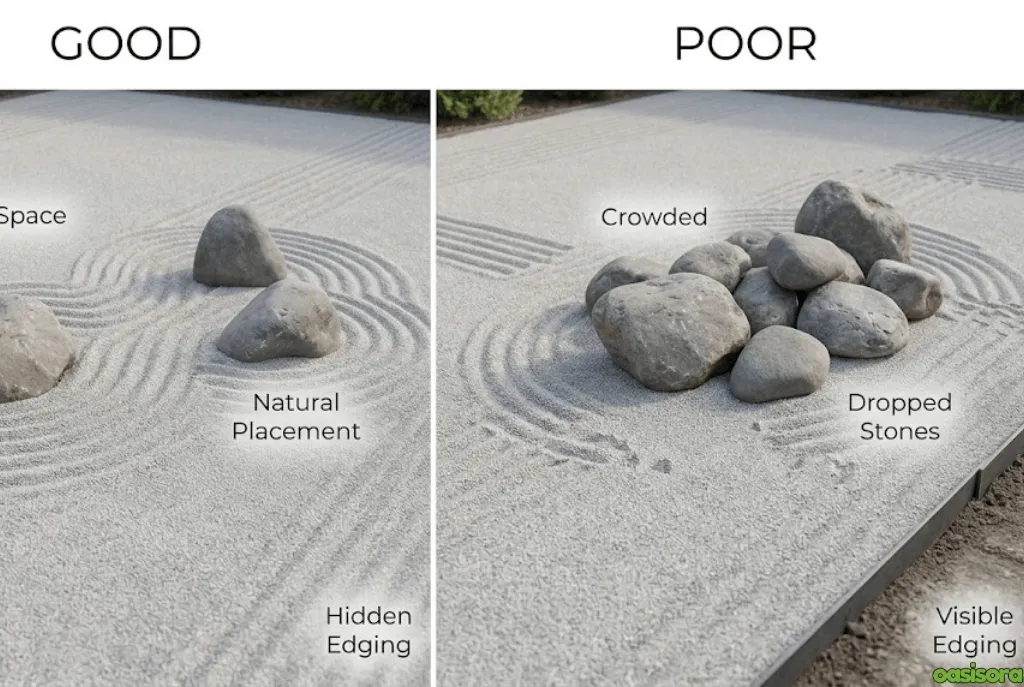
Subject: Side-by-side comparison of balanced Zen garden stone placement versus crowded or poorly positioned stones.
Purpose: Help readers visually evaluate their own finished design.
Composition: Two clearly labeled examples with the same viewing perspective. Use callouts for negative space, stone positioning, and visual balance.
Suggested filename: good-vs-poor-zen-garden-stone-placement.jpg
Suggested alt text: Good versus poor Zen garden stone placement comparison
Negative Space: Does most of the garden feel open and uncluttered?
Stone Placement: Do the rocks look naturally rooted, or do they look like they were just dropped on top of the gravel?
Viewing Angle: Does the raking pattern draw your eye smoothly across the space?
Edging: Is the steel edging completely hidden from your normal sightline?
How to Maintain a Zen Garden Throughout the Year
A Zen garden is low-maintenance, not no-maintenance. Without consistent care, wind-blown seeds will sprout, and the patterns will look flat. For homeowners looking to reduce weekend chores, implementing a low-maintenance backyard Zen garden strategy can be a practical solution.
| Season | Maintenance Task | Recommended Tool |
| Spring | Inspect for weeds and check edging | Hand tools as needed |
| Summer | Light raking to refresh patterns | Wooden Zen rake |
| Fall | Remove fallen leaves promptly | Leaf blower on a low setting |
| Winter | Trim nearby plants and inspect gravel depth | Hand pruners |
💡 PRO TIP: I spend no more than 15–20 minutes each week maintaining an established Zen garden. A few minutes of regular care prevents hours of tedious weeding later.
Note: Specific maintenance intervals and any herbicide or pre-emergent recommendations should be verified for the garden’s climate, plants, and local regulations before publication.
Common Zen Garden Mistakes to Avoid
Using Playground Sand Instead of Gravel
Mistake: Using playground sand as the primary surface material.
Why it causes a problem: Sand is fine and can be displaced by wind and heavy rain, making it difficult to maintain crisp patterns.
Better approach: Use a suitable crushed or decomposed granite product selected for the intended application.
Placing Rocks on Top of the Gravel
Mistake: Placing anchor rocks directly on top of the finished gravel.
Why it causes a problem: Stones can look visually disconnected from the landscape and may shift or settle unevenly.
Better approach: Position major rocks before installing the finished gravel surface and set them securely in the prepared foundation.
Frequently Asked Questions
What Is Another Name for a Zen Garden?
A Zen garden is commonly known as a Karesansui, a term associated with the Japanese dry-landscape garden tradition.
What Does a Zen Garden Symbolize?
It can represent elements of nature—such as water, mountains, and islands—in a minimal, abstract form. Raked gravel and carefully placed stones allow natural landscapes to be suggested without literally reproducing them.
Can a Zen Garden Have Water Features?
Traditional Karesansui gardens use dry materials to represent water symbolically through elements such as raked gravel. Modern Western interpretations may incorporate water features, but that creates a broader garden style rather than following a strictly dry-landscape approach.
Do Zen Gardens Attract Insects or Snakes?
A clean, well-maintained Zen garden is not inherently more likely to attract pests than other landscaped areas. Dense vegetation, nearby habitat, moisture, and local environmental conditions are more relevant factors. Keeping gravel maintained and vegetation appropriately managed can reduce some unwanted habitat.
What Is the Most Famous Zen Garden in the World?
Ryoan-ji’s garden in Kyoto, Japan, is one of the world’s best-known Japanese dry-landscape gardens. Its carefully arranged groups of stones and moss have made it an iconic example of the style.
Can Beginners Build a Zen Garden Successfully?
Yes. By following a step-by-step process, choosing suitable foundation and surface materials, and keeping the design minimal, even first-time gardeners can create a functional and visually cohesive dry garden.
The key is to plan the viewing position first, establish the major stone arrangement before spreading gravel, build a stable foundation, and avoid adding decorative elements simply to fill empty space.